Quantcast
Channel: SharePoint JavaScripts
Viewing all 391 articles
Browse latest View live

Autocomplete for text and people picker fields

$
0
0

I have previously posted a few solutions here and here, but those are old and does not work for new SharePoint versions.

I have redone the solution to bring it up to support SP2007, SP2010 and SP2013. This is a total remake that does not rely upon jQueryUI for the autocomplete part.

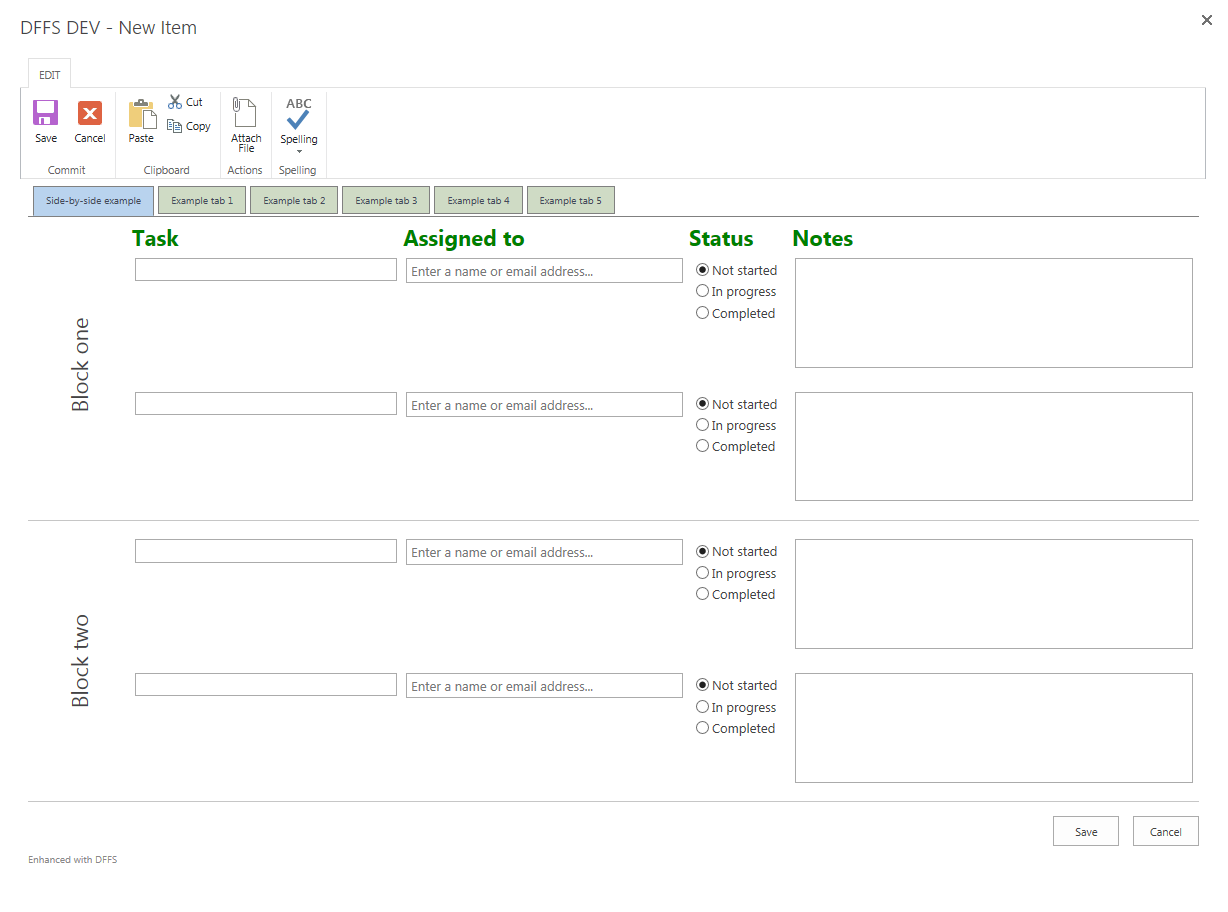
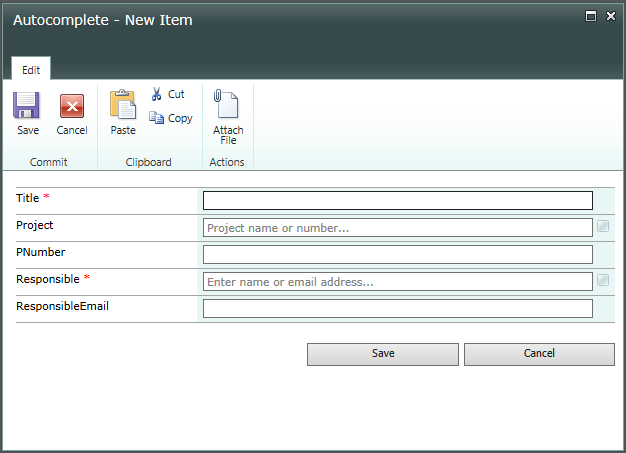
In this example, I have added autocomplete to the single line of text field “Project”, and to the single choice people picker “Responsible”.
IMG

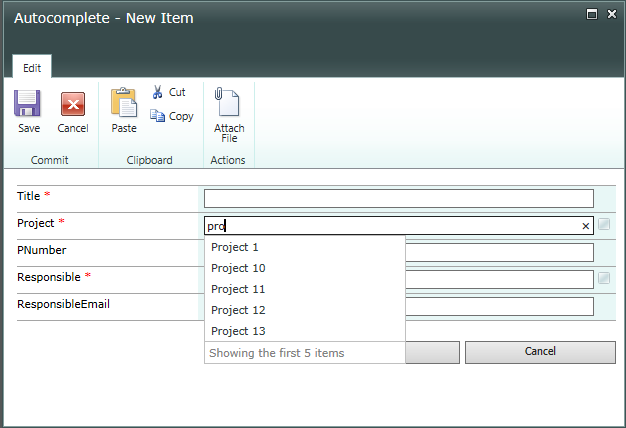
Here I have started typing in the Project field:
IMG
You can use this solution with single line of text columns and single choice people picker columns. I have not built in support for multi choice people pickers.

Please note that this solution is made for unmodified SharePoint forms (NewForm and EditForm) and will not work for custom forms modified in SPD or InfoPath. It will however play nice with DFFS.

The people picker autocomplete is not available in SP 2013 as this version already have this built in.

How to set it up
  1. If you don’t have jQuery already, get it here
  2. Get the latest version of spjs-utility.js from here.
  3. Download the file “spjs-autocomplete.js” from here.
  4. Add the code below the form in NewForm and EditForm as described below.
Setup for a single line of text column

Add this code below the form web part in NewForm and EditForm using a HTML form Web Part, Script Editor or link to a file containing the code from a Content Editor Web Part using the content link option.

<script type="text/javascript" src="/Scripts/jquery-1.11.0.min.js"></script>
<script type="text/javascript" src="/Scripts/spjs-utility/spjs-utility.js"></script>
<script type="text/javascript" src="/Scripts/Autocomplete/spjs-autocomplete.js"></script>
<script type="text/javascript">
var fields = init_fields_v2();

spjs.ac.textField({
	"applyTo":"Project",
	"helpText":"Project name or number...",
	"listGuid":"ProjectList",
	"listBaseUrl":"/test",
	"showField":"Title",
	"rowLimit":15,
	"listOptionsOnFocus":false,
	"setFields":[
		{
			"fromFIN":"ProjectNumber",
			"toFIN":"PNumber",
			"skipIfEmpty":false
		}
	]					
});					
	
</script>
Options explained:
  • applyTo: The FieldInternalName of the field to add autocomplete to.
  • helpText: The text in the autocomplete field when it is empty
  • listGuid: The list GUID or the display name of the list you are pulling the options from.
  • listBaseUrl: The base url of the list. For a subsite named “Test”, this is the correct base url: “/test”. For the root site, use an empty string like this: “”.
  • showField: This is the field to show in the autocomplete.
  • rowLimit: This is the max number of items to pull back. Use a low number to keep the query lightweight and fast.
  • listOptionsOnFocus: true or false determines whether or not to pull in the first batch when the field gets focus. Setting this to true will mimic a dropdown with an arrow to the right.
  • setFields: This in an array of objects containing additional fields to pull in and set based on the selection. It has these properties:
    • fromFIN: The FieldInternalName of the field in the list you are pulling from.
    • toFIN: The FieldInternalName of the field in the list you are writing to.
    • skipIfEmpty: true or false determines whether or not to skip this option if this field is empty.
Setup for a single choice people picker

Add this code below the form web part in NewForm and EditForm using a HTML form Web Part, Script Editor or link to a file containing the code from a Content Editor Web Part using the content link option.

<script type="text/javascript" src="/Scripts/jquery-1.11.0.min.js"></script>
<script type="text/javascript" src="/Scripts/spjs-utility/spjs-utility.js"></script>
<script type="text/javascript" src="/Scripts/Autocomplete/spjs-autocomplete.js"></script>
<script type="text/javascript">
var fields = init_fields_v2();

spjs.ac.peoplePicker({
	"applyTo":"Responsible",
	"helpText":"Enter name or email address...",
	"showField":"Title",
	"chooseFromUserGroup":null,
	"showUsersOnly":true,
	"rowLimit":5,
	"listOptionsOnFocus":false,
	"setFields":[
		{
			"fromFIN":"EMail",
			"toFIN":"ResponsibleEmail",
			"skipIfEmpty":false
		}
	]
});
	
</script>
Options explained:

The shared options are explained in the previous section.

  • chooseFromUserGroup: If you want to limit the selection to a specific user group, add the name or the ID here. The ID must be added as an integer. Leave as null to search all users. Please note that you cannot let the autocomplete search among all users while the people picker itself (in the list settings) is restricted to a certain group.
  • showUsersOnly: true or false determines whether or not to show users and groups, or users only.
Override the labels and text

Add this to the CEWP code (above the function call to spjs.ac.peoplePicker or spjs.ac.textField) to override the standard texts. Translate as you like.

spjs.ac.text = {
	"imgTitle":"The list of valid choices is updated automatically when you type",
	"noItems":"No items match your search",
	"noValidItems":"No valid items match your search",
	"invalid":"Invalid value",
	"moreItemsLabel":"Showing the first {0} items",
	"moreItemsMouseover":"Continue typing to narrow your search",
	"searching":"Searching for: "
};
How to use this with DFFS

To use this with DFFS you must add the script reference to “spjs-autocomplete.js” in the CEWP code for DFFS, and wrap the function call like this:

function dffs_Ready(){
	spjs.ac.peoplePicker({
		"applyTo":"Responsible",
		"helpText":"Enter name or email address...",
		"showField":"Title",
		"chooseFromUserGroup":null,
		"showUsersOnly":true,
		"rowLimit":5,
		"listOptionsOnFocus":false,
		"setFields":[
			{
				"fromFIN":"EMail",
				"toFIN":"ResponsibleEmail",
				"skipIfEmpty":false
			}
		]
	});
}

You can also add the function call to the Custom JS section in the Misc tab. In this case you do not wrap it in dffs_Ready().

Post any bugs or feedback in the comments below.

Alexander


Resource management: Now compatible with DFFS

$
0
0

I have previously posted a solution for preventing double booking of resources. This is a remake of the resource management solution that is more lightweight, and can be used with DFFS. It can also be used as a standalone solution.
IMG

Please note:
This solution is made for unmodified SharePoint forms.
How to set it up with DFFS

Add a reference to SPJSRM.js from the CEWP of HTML Form Web Part where you include the DFFS solution. When you have done this, you will see a new tab in the DFFS configuration screen with instructions on how to activate this solution. To see this new tab you must have DFFS v3.340 or later, but you can use it in a previous version also as you call the script from the Custom JS section in the Misc tab like this:

var spjsRmArgs = {
"resourceField":"MeetingRoom",
"dateFrom":"StartDate",
"dateTo":"EndDate",
"timeFormat":24
};
spjs.rm.init(spjsRmArgs);
Use it as a standalone solution

You must include spjs-utility.js and add the code to the bottom of the form web part like this:

<script type="text/javascript" src="/Scripts/jquery-1.11.2.min.js"></script>
<script type="text/javascript" src="/Scripts/spjs-utility/spjs-utility.js"></script>
<script type="text/javascript" src="/Scripts/SPJSRM/SPJSRM.js"></script>
<script type="text/javascript">

var spjsRmArgs = {
"resourceField":"MeetingRoom",
"dateFrom":"StartDate",
"dateTo":"EndDate",
"timeFormat":24
};
spjs.rm.init(spjsRmArgs);
</script>
Setup
  • resourceField: This is the FieldInternalName of the field you have the “resource” in. This can be a lookup column (single choice), a people picker (single choice) or any other single choice field present in the form.
  • dateFrom and dateTo: This is the FieldInternalName of the date fields. This solution will NOT handle recurring events.
  • timeFormat: This is either 12 or 24 and is for displaying the time ranges in the overlap message in the correct format.
SharePoint 2007

If you are using SP2007 you must provide the list GUID or DisplayName in the argument like this:

var spjsRmArgs = {
"listName":"TheListGuidOfThisList",
"resourceField":"MeetingRoom",
...
Download

Get spjsrm.js here (ensure you use v2.0 or above) and spjs-utility.js here.

Localization

To localize the text in the various messages from this solution, add this object to the CEWP alongside the function call:

spjs.rm.text = {
	"overlapMsg":"{0} has already been booked by {1} between {2} and {3}.",
	"endBeforeStartMsg":"End time cannot be less than or equal to start time.",
	"empty":"{0} cannot be left empty!",
	"wrongDateFormat":"Please use this date format: {0}"
};

Translate the text as you like, but keep the {placeholders}.

KPI for SharePoint 2010 and 2013

$
0
0

I received a question about the built in KPI in SP 2010. The user added the KPI to a list view that was filtered with a Query String Filter, but the KPI didn’t respect the filter and kept calculating based on the unfiltered view.

I don’t know if you can do anything about the built in KPI, but It’s a good opportunity to write some JavaScript!

Here is a solution you can drop in any list view to create a KPI that respects both Query String Filters and filters applied by the end user to the columns. The solution requires SP 2010 or 2013 (foundation or server), as it uses the JavaScript Client Object Model. It does NOT require jQuery.

IMG

Get the code for the file “SPJS-KPI.js” from here

Upload it to a document library where all users have read access, and add a HTML Form Web Part with this code in the list view or the web part page:

<table cellpadding="3" cellspacing="0">
	<tr style="font-size:24px;">
		<td valign="middle">KPI attached to list view:</td>
		<td valign="middle" id="kpi_1" style="height:55px;"><img style="margin:12px;" src="/_layouts/images/hig_progcircle_loading24.gif"></td>	
	</tr>

</table>
<script type="text/javascript" src="/SPJS/SimpleKPI/SPJS-KPI.js"></script>
<script type="text/javascript">

ExecuteOrDelayUntilScriptLoaded(function(){
	// KPI example 1
	var args = {
		// Placeholder for the KPI must be an existing HTML element in the page with this ID
		"placeholderID":"kpi_1",
		// Target list and base URL
		"listGUID":_spPageContextInfo.pageListId,
		"listBaseUrl":_spPageContextInfo.webServerRelativeUrl,
		// Target view - must be filled in to use "consumeFiltersFromList"
		"consumeFiltersFromViewGUID":"23233f84-531c-4096-b23b-d6711f117a2d",
		// URL Filter
		"URLfilterKey":"",
		"URLfilterTargetField":"",
		// KPI Indicator field and value
		"kpiIndicatorField":"Reviewed",		
		"kpiIndicatorFieldValue":true,
		// Text
		"noFilterMessage":"The URL filter \"{0}\" is missing.",
		"noItemsFoundMessage":"No items match the filter",
		// Threshold
		"greenThreshold":98,
		"yellowThreshold":80,
		// Icons
		"greenIcon":"/_layouts/images/kpidefaultlarge-0.gif",
		"yellowIcon":"/_layouts/images/kpidefaultlarge-1.gif",
		"redIcon":"/_layouts/images/kpidefaultlarge-2.gif"		
	};	
	spjs.kpi.init(args);	
}, "sp.js");
</script>

Update the link to the file “SPJS-KPI.js” in the code example.

Variables explained
  • placeholderID: This is the ID of a HTML element in the page where you want the KPI to appear.
  • listGUID: This is the list GUID of the list you want to attach the KPI to. If you are using a list view from the list itself (not a web part page), you can use the variable from the example. If not, add the GUID to the list here. To find the GUID, go to a list view, right click and view source. Look for “pageListId”.
  • listBaseUrl: If the KPI list is in the same site, use the variable from the example. If not, add the path like this: “/Sites/NameOfTheSite”
  • consumeFiltersFromViewGUID: To have the filter consume the filters from a list view, add the GUID of the view you are applying the filter to here. Find the list GUID by filtering the view and look at the URL. In SP 2010 you see “View=xxxxxxxx-xxxx-xxxx-xxxx-xxxxxxxxxxxx”, in SP 2013 you see it like this: InplviewHashxxxxxxxx-xxxx-xxxx-xxxx-xxxxxxxxxxxx. The GUID is where the x’es are.
  • URLfilterKey: If you are using an URL filter, this is the key from the URL like this: …/AllItems.aspx?key=value
  • URLfilterTargetField: This is the FieldInternalName of the field in the list where the filter is applied.
  • kpiIndicatorField: This is the FieldInternalName of the field you calculate the KPI from.
  • kpiIndicatorFieldValue: This is the value found in the field you calculate the KPI from. If it is a Yes/No column, use boolean value true or false.
  • greenThreshold: The percentage needed to show the green icon.
  • yellowThreshold: The percentage needed to show the yellow icon (the rest is red).
  • greenIcon, yellowIcon and redIcon: URL to the images.

Ask if you need help or you find a bug.

Alexander

Dynamic Forms for SharePoint v4

$
0
0

Finally version 4 of my most popular solution is ready to be released!

This version adds new, as well as streamline existing functionality. You find the new version here.

I have also added a forum for discussions relate to the various solutions in this blog. I will close the comments section on the articles shortly, and route all discussions to the forum.

This will make it easier to find answers to questions already answered, and will make my support job easier.

Unfortunately you will have to register for a user account to add new topics, and to comment on existing. Due to problems with SPAM you will have to request a user account by email to me. You find the link as a sticky post in the top of all forums.

Please note:

The forums was added on September 3, 2014. At the moment, they are more or less empty.

You will however find a lot of comments on the different articles, and you might want to look trough those first.

I hope you enjoy the new version of DFFS, and that you participate in the discussions in the forum!

Best regards,
Alexander

Signed up for a forum user and not received an email – check your junk mail!

$
0
0

If you have registered for a forum user and have not received the login details within 24 hours, please check your junk email!

It also looks like there is a problem with the “lost password” functionality. I’m looking into it right now.

Alexander

Dynamic Forms for SharePoint v4: User manual

$
0
0

All users who buy a license for DFFS v4 will receive a 30 pages complete manual describing all settings.

Already have a DFFS v3.x license?

Users who have an existing DFFS v3.x license are also entitled to receiving this manual. You must drop me an email, and include the original license code.

Licens codes in the user profile

For registered forum users I add the license codes to the user profile. You can access this by clicking your name in the top right corner and selecting “Edit My Profile”.

For users with a DFFS v3.x license I’ll need you to send me a request for adding this code to the profile. Include the original license code in the email.

Register for a forum user

You find the link to sign up for a user account here.

My email address

You find my email address in the “About me” tab in the top link bar in this page.

Where can I buy a license?

See the “Products” menu in the top of this page.

All questions regarding DFFS v4 must be added to the forum

DFFS v4 forum

Alexander

DFFS v4: User manual now freely available

vLookup for SharePoint v2.0 is out

$
0
0

I have finally released v2.0 of my vLookup solution. There are a few new features, and it is better integrated into the DFFS backend.

You find the complete change log here.

Please note that this version does not have the “editor” built in to the frontend and you can no longer configure vLookup by adding ?vLookupSetup=1 to the URL. You must now configure vLookup from the DFFS_backend in the vLookup tab.

There has been some major changes to the code and you must test it in your setup before adding it to a production environment.

Folder support

One of the new features lets you have folders as children (in document libraries).

This way you can now add a folder from the vLookup “add child” link and have vLookup show all documents and subfolders added to this folder.

The metadata that makes the connection to the parent item is now on the folder and not the individual document.

Any documents uploaded to this folder will show in the parent item and there is no need to tag the individual documents with a connection to the parent item. It will show all documents and subfolders that are added to this parent folder.
IMG

I have also finally crated a user manual that describes the setup process and all the configuration options.

Get the new version

You find the link to download the new version in the Products menu in the top of this page.

Questions, comments or bugs

Please post any questions, bugs or feature requests in the forum.

Alexander


DFFS v4.210 BETA

$
0
0
BETA 2 of DFFS frontend released January 19, 2015
Please note that this version is BETA and is NOT intended for a production environment.

I have released a new BETA version (v4.210 BETA) of DFFS, but I need help testing it as I have made some fundamental changes to how “initial values” are retrieved, and to how read only fields are “styled” to maintain the correct width of the field. There are also a quite a few bugfixes and other changes that I would like your feedback on.

The full change log is as follows
Changes and new features
  • Changed how read only fields are “styled” when using side-by-side to try to maintain the width of the field. This change needs testing – let me know how it works in your setup.
  • Changed how initial value is retrieved when the form loads. Previously DFFS read the values from the fields using the function “getFieldValue”, but now it uses a web service call to get the current item metadata from the DB. This is done to try to overcome the problems some have been experiencing with people pickers not being ready when set to readonly when the form loads. This change needs testing – let me know how it works in your setup.
  • Changed how you reorder fields in tabs in the backend.
  • Boolean values will be displayed as checkboxes in DispForm.
  • New: Changed tab color on hover to a slightly lighter color (update CSS file for the frontend).
  • Added class “dffs-accordion-activePanel” to active accordion panel. You can use this class for your “custom code”.
  • New: Added support for comparing dates with hours and minutes. Please note that you cannot use hour and minute when comparing dates in DispForm.
  • New: Added “between” operator.
  • New: You can now add a new field to the list from the Misc tab (SP 2010 and 2013 only).
Bugfixes
  • When no configuration has been created for a form, the overlay would time out with “This took forever”.
  • When using side-by-side and hidden label you could got a linefeed after the star that indicates that the field is required.
  • Selected tab index trigger: added “change event” as this trigger only fired on load and not on change of tab.
  • Only the first rule using the trigger “Selected tab index” could be used in “and these rules are true”.
  • The rule debug output was missing “run these functions”.
  • Date pickers: In some cases, errors would appear in the developer console in SP2013 when operating date pickers.
  • Date pickers: The “blur” event was not triggered on the “master” datepicker when using “linked” datepickers and modifying the “slave”.
  • When a field was configured in DFFS, but it was not in the current content type, you could in some cases get an error like “unable to get the property “hidden” of undefined or null reference” in the developer console.
  • The Attachement field will no longer trigger the “orphans” tab.
  • In the frontend I have changed from referring jQuery as $ to use spjs.$ due to an error in SharePoint when using rich text fields and “Insert > Link > From SharePoint” as the file “assetpicker.js” will “kill” jQuery by overriding the global $ variable. This would result in a complete halt in all the functionality in DFFS (and other plugins using jQuery). Please note that other plugins must also be updated. Look at the change log for each one to see which one have been updated.
  • Scroll to first input will no longer make the form scroll down. If the first input is off the visisble sceen, it will not get focus.
  • BETA 2: Fixed bug occurring when you for some reason had duplicates of the configuration in the configuration list. Now only the first “match” will be used, and you will no longer see duplication of rules and tabs.
  • BETA 2: Fixed a bug where “rule messages” did not show for readonly fields.
  • BETA 2: Fixed a bug in setting field value for a date only field when this is read only. It will now show date only and not date and time. Please note: You must also update spjs-utility.js to v1.200 or later.
Get the BETA version here

Follow this link, and ensure you get the latest version. PS: The files are uncompressed, therefore the files are bigger than the production release.

Give feedback in the forum

Please post any findings or questions regarding the 4.210 BETA in this topic in the forums.

Unfortunately I have not been able to test this as thoroughly as I wanted, but I could not wait any longer to make it available. Post any findings to the forum, and I will fix the issues as soon as I can manage.

The more of you that gives feedback, the faster the production version will be released!

Best regards,
Alexander

vLookup for SharePoint 2010-13 v2.100 BETA

$
0
0

I have published a BETA version of vLookup Frontend with these changes:

  • Fixed a bug where number columns could not use the “css” set in vLookup setup.
  • Changed how the list name is picked up from the URL as this would fail in some cases – as described here.
  • Added support for settings SPFieldLookupMulti fields when creating children – as requested here.
  • Changed the $ to spjs.$ as I did in the latest BETA of DFFS due to an error in SharePoint when using rich text fields and “Insert > Link > From SharePoint” as the file “assetpicker.js” will “kill” jQuery by overriding the global $ variable.

Get the latest BETA version here (ensure you pick the latest one).

This is released as a BETA due to the changes in how jQuery is referred. Please post any findings or questions in the forum.

Best regards,
Alexander

SPJS-Lookup: Convert a single line textfield to a dropdown select based on a query

$
0
0
Change log

v1.10 (February 28, 2015):
If you want to have the same list of choices in multiple fields, you can now populate an unlimited number of fields from one single query. All you have to do is to use an array of fields in the parameter “fieldToConvertToDropdown”. See code example below for details.

v1.05 (February 12, 2015):
Added option to specify a folder in the query. The custom CAML or query will search only in the specified folder. Please note that you must update spjs-utility.js to v1.205 or later.

v1.04:
Removed a border around an image that occurred in SP 2010.

v1.03:
Fix for “addToExternalList” when using the solution for multiple fields in a form, and more than one targetted the same lookup list. The callback would refresh the bottom SPJS-Lookup field as the “argument object” was not uniquely identified.

January 21, 2015
v1.02:
Fixed a bug where I had mistakenly used the display name and not the FieldInternalName as identifier for the fields.

This is a remake of a solution I posted in 2009. It does mostly the same as the old one, but the code is overhauled, and it is now compatible with DFFS.

What does it do?

This solution is used to convert a single line of text field into a dropdown select. The options for this select is the result of a query you build in the function call. You can use it to query any list within the same site collection. You have an option to add new values to the “lookup list” on the fly, or to enter a value free hand.

This solution is compatible with SP2007, SP 2010 and SP2013.

DFFS plugin

This is compatible with DFFS, but you will not find a dedicated “tab” in DFFS to set it up. You must therefore use the same code for both DFFS and standalone use. With DFFS you have the option to put the function call in the Custom JS section in the Misc tab.

The code

If you use it as a standalone solution, you must refer jQuery and SPJS-utility.js in addition to SPJS-lookup.js.

In a standalone setup it will look something like this
<script type="text/javascript" src="/code/jquery-1.11.2.min.js"></script>
<script type="text/javascript" src="/code/spjs-utility.js"></script>
<script type="text/javascript" src="/code/spjs-lookup.js"></script>
<script type="text/javascript">
// Put the contents from the code block below here.
</script>

If you use it with DFFS, the only extra script you need is this (in the DFFS_frontend CEWP) – put it below the reference to spjs-utility.js:

<script type="text/javascript" src="/code/spjs-lookup.js"></script>
The function call
spjs.lookup.init({
	"fieldToConvertToDropdown":["MyTextField"],	
	"listName":"Tasks",
	"listBaseUrl":"/Sites/MySite",
	"optTextFieldInternalName":"Title",
	"sortFieldName":"Title",
	"filterObj":{
		"on":true,
		"folder":"", // Leave empty to search in all folders
		"CAML":null, // If used, the rest of the filterObj settings are disregarded
		"fin":"Completed",
		"isLookup":false,
		"operator":"Neq",
		"filterVal":"1"
	},
	"dropDownDefaultvalue":"...",
	"addYouOwnValue":{
		"on":true,
		"linkText":"Write your own value"
	},
	"addToExternalList":{
		"on":false,
		"customFunction":null, // Function name as a string. If a function name is supplied, this will be used in stead of the default function. The function will be passed the argument object as a parameter.
		"linkText":"Add new item",
		"saveNewItemText":"Save new item"
	},
	"debug":false
});
Parameter details
  • fieldToConvertToDropdown: This is an array or FieldInternalNames of the fields in the current list that you want to convert to a dropdown. Specify multiple fields like this: [“FirstField”,”SecondField”] to have all server the same options based on one single query.
  • listName: This is the display name or the list GUID of the list you read the options from.
  • listBaseUrl: This is the base URL of the list you read the options from. If the list is on the root site of your domain, the value will be an empty string like this “”. If it is on a managed path, it will be something like this: “/Sites/MySite”
  • optTextFieldInternalName: This is the FieldInternalName of the field that represents the options you want to show in the dropdown select.
  • sortFieldName: This is the FieldInternalName of the field you want to sort the options by. Most likely the same as “optTextFieldInternalName”.
  • filterObj
    • on: true or false to tell if the options should be filtered. If false, all options will be shown.
    • folder: Here you can provide a relative URL to a folder like this: /Sites/MySite/Lists/MyList/MyFolder/MySubFolder
    • CAML: Here you can provide the full CAML query to filter by. If this is left as null, the other options below will take effect.
    • fin: The FieldInternal name you want to filter on.
    • isLookup: true or false. If you filter by a text value, use false. If you filter by an ID in a lookup field, set it as true.
    • operator: Use anu valid CAML operator like “Eq”, “Neq”, “BeginsWith” or “Contains”.
    • filterVal: This is the value you want to filter by.
  • dropDownDefaultvalue: This is the default value in the dropdown when it has not been selected.
  • addYouOwnValue
    • on: true or false. This controls whether or not to show a link to “kill” the dropdown and show the underlaying text field.
    • linkText: This is text on the link.
  • addToExternalList
    • on: true or false. This controls whether or not to show a link to add an item to the list you are pulling the options from.
    • customFunction: If you want to override the built “addToExternalList” function, add your custom function name here like this: “myAddListItemFunc”. The function itself must be present in the page, and it will get the full “argObj” passed to it as a parameter.
    • linkText: The link text that initiates the “addToExternalList” function.
    • saveNewItemText: The text on the “save” link.
  • debug: true or false. If true, the underlaying text field will not be hidden, and you will see a yellow information panel in the top of the page.
Setting a value in a field with this solution activated

To set the value of a field when using this solution, use code like this:

spjs.lookup.setValue("FieldInternalName_of_your_field","The value you want to set");

This will also work with DFFS and will trigger any rule currently configured for the underlaying text field (by triggering the blur-event).

Questions or feedback

Please use the forum for all questions related to this solution.

Alexander

SPJS-Utility.js is updated to v1.200

$
0
0

I have updated SPJS-utility.js to v1.200. I have changed the file so all functions are now part of the “spjs.utility” namespace. I have included support for existing code using the old function names as well. There are not many changes to the functionality, but a few small changes to setFieldValue and getFieldValue related to various bugs reported from DFFS.

Get the updated version here

This file has always contained “internal” functions used in various solutions, but you can use the functions in your custom code. Unfortunately there is not documentation made at this point, but you can post questions in the SPJS-Utility forum.

Alexander

Cascading dropdowns updated to v3.30

DFFS v4.210 Frontend BETA 2

DFFS v4.250 released

$
0
0

This release has multiple changes and additions from the previous production release (v4.200). You find the complete changelog her: http://spjsblog.com/dffs/dffs-change-log/

I will show you one enhancement in particular – the new options for side-by-side headings and labels:
IMG

This layout is achieved with this configuration
In the “Tabs” tab I have added this configuration:

IMG
Please note how the headers are moved to the side-by-side column using the “Header ID”.

In the Side-by-side tab I have added these labels:

IMG

In the Custom CSS section in the Misc tab I have added this code:
.dffs-vertical-text{
text-align:center;
transform: rotate(-90deg);
font-size:22px;
}
td.sbs_tdIndex_1, td.sbs_tdIndex_2, td.sbs_tdIndex_3, td.sbs_tdIndex_4{
	width:350px !important;
}
td.sbs_Field input.ms-long, td.sbs_Field div.sp-peoplepicker-topLevel{
	width:250px !important;
}
Comments and feedback

Please add any comments, questions or feedback in the forum: http://spjsblog.com/forums/forum/dynamic-forms-for-sharepoint/

Alexander


DFFS v4.25x still has a few bugs

$
0
0

Hi,
Unfortunately, DFFS v4.25x still has some bugs. There were made a few fundamental changes to how “initial value” was read, and this new query fails if the list contains more that “the allowed” number of lookup columns – this is columns of type “people picker”, “lookup”, “managed metadata / taxonomy fields”. The number of allowed lookup columns is set on the server side, so I will have to rethink how this query is performed.

I’m currently working on a fix, and will post an updated version during this weekend.

Post any questions or feedback here: http://spjsblog.com/forums/forum/dynamic-forms-for-sharepoint/

Sorry for the inconvenience,
Alexander

DFFS v4.253

SPJS Poll for SharePoint v2.0

$
0
0

I have brushed up the 5 year old solution Poll for SharePoint, to change the deprecated “Google Image Charts to use Google Charts (AKA Google Visualization). The Image Charts are officially deprecated, but will probably continue working for some time, but to ensure you have a working solution, you should upgrade to this new version.

Please note that there are some changes to the Content Editor Web Part code, so existing users must not only update the script file, but also look over the CEWP code and make some small changes.

This code lets you generate polls without the need for server side installed WebParts.
Change log
March 15, 2015
v2.0 released. This one has no new functionality, but the code has been brushed up, and now the charts are generated using “Google Charts” rather than “Image Charts”.
Poll

IMG

Result with column chart

IMG

How to set it up
Create a custom list with the following fields
  • Answer: Single line of text
  • Question: Single line of text

Name it anything you like, but keep the display name fairly simple (no special characters) as you will use the display name in the CEWP code.

CEWP code

The CEWP code below refers jQuery from Google. If you have a local copy of jQuery you can change the script src. You find the code for the file “SPJS-Poll.js” at the bottom of the page.

NOTE: You must change the script src for the file “SPJS-Poll.js” and “spjs-utility.js” to point your instance of the files – the CEWP code will not work unless you do this.
Place this code where you want the poll to appear:
<div id="SPJS_Poll"></div>
<link type="text/css" href="/Scripts/Poll/spjs_poll.css" rel="stylesheet">
<script type="text/javascript" src="https://www.google.com/jsapi"></script>
<script type="text/javascript" src="https://code.jquery.com/jquery-1.11.2.min.js"></script>
<script type="text/javascript" src="/Scripts/spjs-utility/spjs-utility.js"></script>
<script type="text/javascript" src="/Scripts/Poll/SPJS-Poll.js"></script>
<script type="text/javascript">

// Preload the chart solution
google.load("visualization", "1", {"packages":["corechart","table"]});

// If you want to override these texts, uncomment the object and localize as you like.
/* 
	spjs.poll.text = {
		"submitLinkText":"Submit",
		"backLinkText":"Back",
		"showResultBtnText":"Show result",
		"pollNotActiveText":"The poll is not active prior to {0}",
		"pollEndedText":"The poll ended on {0}",
		"alreadyRespondedText":"You answered: ",
		"totalResponsesLabel":"Total responses: ",
		"chartLegendLabels":["Answer","Count"]

	};
*/

spjs.poll.init({pollAnswerListName:'Poll',
				listBaseUrl:L_Menu_BaseUrl,				
				id:"Poll_3", // Allowed characters id a-z, 0-9 - and _
				start:"01/02/2015", // format: mm/dd/yyyy
				end:"03/15/2015", // format: mm/dd/yyyy
				singleResponse:false,
				q:"What is your favorite junk food?",
				qStyle:"font-size:1.5em;color:#444;",
				aStyle:"font-size:xx-small",
				a:["Pizza","Hot dog","Hamburger","Neither of them"], // Leave empty for free input				
				color:["red","green","blue","orange"],
				forceLowerCaseAnswer:false, // Group result by lowercase				
				chart:"col", // table, bar, col or pie
				height:200,
				width:500});

</script>

Object attributes explained

  • pollAnswerListName: DisplayName or GUID of the list that stores the answers
  • listBaseUrl: The baseUrl of the site. This is like “/sites/hr” when the list is located in the site “hr” under “/sites”. Use L_Menu_BaseUrl (or omit the property) for current site.
  • id: The unique id of the poll. All poll answers are stored in a list and this id is used to separate each poll
  • start: Start date in the format mm/dd/yyyy
  • end: End date in the format mm/dd/yyyy
  • singleResponse: true for one reply per user, false for unlimited number of replies
  • q: Poll question. To have a linefeed in the question, use <br>
  • qStyle: CSS syntax style
  • aStyle: CSS syntax style
  • a: Answers in an array format. To use free input and not predefined answers, leave the array empty.
  • color: Colors for the chart in an array format. This must have the same length as the previous parameter – one color for each answer
  • forceLowerCaseAnswer: Primarily for use with free input to avoid getting two “series” when the only difference are uppercase characters.
  • chart: “bar” for bar chart, “col” for column chart, “pie” for pie chart or “table” for a plain table.
  • height: Height in pixels
  • width: Width in pixels
Regarding free input

If you leave the attribute “a” as an empty array, the user can supply free text as “answer”. When using free input, the result are automatically presented as a table.

Download code

The code for the file SPJS-Poll.js. You find spjs-utility.js here.

Questions or feedback

Post any questions in the forum

Alexander

SPJS Simple tooltip

$
0
0

By request I have “ripped” the DFFS tooltip from DFFS. This code can use to create a custom tooltip with the same style and function as in DFFS. This means that you can have a hover-over tooltip that sticks if you click the hover-image.

Take a look at it, and familiarize with the code before asking questions.

The tooltip text or HTML is added to the variable “SPJS_SimpleTooltipContents”, and the “key” is used in the image “onmouseover” to pull in the correct tooltip.

The code
<style type="text/css">
div.SPJS_SimpleTooltipPlaceholder img{
	cursor:pointer;
}
#SPJS_SimpleTooltipPlaceholder{
	/*width:350px;*/
	white-space:normal;
	background-color:#E7ECEF;
	border:1px #9F9E9C solid;
	display:none;
	font-size:11px;
	font-weight:normal;
	max-width:500px;
	z-index:1001;
}
div.SPJS_SimpleTooltipHolderHead{
	height: 16px;
	padding:1px;
	border-bottom:1px silver solid;
	background-color:#0072C6;
}	
div.SPJS_SimpleTooltipHolderClose{
	float:right;
	width: 16px;
	height: 16px;
	cursor:pointer;
	background-repeat: no-repeat;
	background-image: url(data:image/png;base64,iVBORw0KGgoAAAANSUhEUgAAABAAAAAQCAYAAAAf8/9hAAAAAXNSR0IArs4c6QAAAARnQU1BAACxjwv8YQUAAAAJcEhZcwAADsMAAA7DAcdvqGQAAAAYdEVYdFNvZnR3YXJlAHBhaW50Lm5ldCA0LjAuM4zml1AAAAB5SURBVDhPzZJBDoAgEAN5CG/jF74fGewigSUcOOgkTaTtrhoN/yHnHIuSFGU3djkFAuMqaiWu5RlJ0QvmkzXqEqkfBneBV+TsefMrAIEKK9bDBgUVR/bDQEnlkaO7G+slBCr0cPa8eUkxjz/j8Y9EiSVoesRd/hUh3IlkrlzxjRMpAAAAAElFTkSuQmCC);
}
</style>

<script type="text/javascript">
var SPJS_SimpleTooltipContents = {
	"helpText1":"<div style='width:200px;'>This is a custom tooltip for field 1<div style='color:red'>You can use HTML</div></div>",
	"helpText2":"<div style='width:200px;'>This is a custom tooltip for field 2<div style='color:red'>You can use HTML</div></div>"
};

var SPJS_SimpleTooltip = {
	"data":{
		"isSP13":typeof _spPageContextInfo !== "undefined" && _spPageContextInfo.webUIVersion === 15 ? true : false
	},
	"show":function(elm,key){
		var p = $(elm).position(), l = {};
		if($("#SPJS_SimpleTooltipPlaceholder").length === 0){
			$("body").append("<div id='SPJS_SimpleTooltipPlaceholder'></div>");
		}
		$(elm).after($("#SPJS_SimpleTooltipPlaceholder"));
		$("#SPJS_SimpleTooltipPlaceholder").html("<div style='padding:3px;'>"+(SPJS_SimpleTooltipContents[key] !== undefined ? SPJS_SimpleTooltipContents[key] : "The tooltip for key \""+key+"\" was not found.")+"</div>").attr("pin","0").css({"position":"absolute","left":p.left+15});
		// Check left pos
		l.l = p.left+30;
		l.tw = $("#SPJS_SimpleTooltipPlaceholder").width();
		l.ww = $(window).width();
		if(l.l + l.tw > l.ww){
			$("#SPJS_SimpleTooltipPlaceholder").css("left",(p.left - (l.l + l.tw - l.ww)));
		}
		$("#SPJS_SimpleTooltipPlaceholder").stop(true,true).fadeIn(200);
	},
	"click":function(elm){
		if($("#SPJS_SimpleTooltipPlaceholder").find("div.SPJS_SimpleTooltipHolderClose").length === 0){
			$("#SPJS_SimpleTooltipPlaceholder").attr("pin","1").prepend("<div class='SPJS_SimpleTooltipHolderHead'><div class='SPJS_SimpleTooltipHolderClose' onclick='SPJS_SimpleTooltip.hide(true);'></div></div>");
		}
	},
	"hide":function(c){
		if($("#SPJS_SimpleTooltipPlaceholder").attr("pin") !== "1" || c){
			$("#SPJS_SimpleTooltipPlaceholder").attr("pin","0").stop(true,true).fadeOut(100);
		}
	}
};

</script>
This HTML code shows you how to use the tooltip
<!-- Example HTML -->
<table cellpadding="0" cellspacing="0">
	<tr>
		<td valign="top">Field 1: </td>
		<td valign="top"><input style="width:300px;" type="text">
			<img onmouseover="SPJS_SimpleTooltip.show(this,'helpText1')" onmouseout="SPJS_SimpleTooltip.hide()" onclick="SPJS_SimpleTooltip.click(this)" src="/_layouts/images/hhelp.gif" border="0">
		</td>
	</tr>
		<tr>
		<td valign="top">Field 2: </td>
		<td valign="top"><input style="width:300px;" type="text">
			<img onmouseover="SPJS_SimpleTooltip.show(this,'helpText2')" onmouseout="SPJS_SimpleTooltip.hide()" onclick="SPJS_SimpleTooltip.click(this)" src="/_layouts/images/hhelp.gif" border="0">
		</td>
	</tr>
</table>
<!-- Example HTML -->

PS: It’s the <img> tags that calls the tooltip, the other HTML is for demonstration only.

I hope you can make use of this code.

Alexander

Cascading dropdowns now supports multi choice

$
0
0

I have updated the cascading dropdown solution to support multi choice in all positions. Refer this article for setup instructions and background information.

To use multichoice on the select, you must use a multiline plain text field as “placeholder”, and address the field like the field “ThisListField2″ in the “spjs.casc.init” function:

spjs.casc.init({
	lookupList:"NameOfYourList",
	lookupListBaseUrl:"BaseUrlOfYourList",
	lookupListFields:["LookupListField1","LookupListField2"],
	thisListFields:["ThisListField1","ThisListField2:multi"],
Edit form

IMG

Display form

IMG

List view

IMG

If you plan to use this with DFFS you must update to DFFS backend v4.259 to support the “:multi” suffix in the cascading dropdown configuration.

Post any questions in the forum

If you do not already have a forum user, look at the sticky post Register for a user account.

Alexander

Viewing all 391 articles
Browse latest View live